How to Price 3D Prints: The Complete Cost Formula (2026)
A step-by-step guide to pricing 3D prints: material, electricity, machine wear, labour, failure buffer and margin, with a full worked example you can copy.
Most people pricing 3D prints get it wrong in the same direction: too cheap. They weigh the filament, multiply by some number they saw in a forum, and quote it. That number ignores the electricity, the slow wear on the machine, and the single biggest cost of all, which is their own time.
This guide fixes that. It walks through every real cost in a 3D print, gives you the formula for each, and ends with a full worked example you can copy. By the end you will be able to quote any print with numbers you can defend to a customer and a margin you can actually live on.
The formula in one line
Every honest 3D print price is built the same way:
Price = (Material + Electricity + Machine wear + Labour) ÷ (1 − failure rate) ÷ (1 − margin)
The four costs inside the brackets are what the print actually costs you to make. The failure rate covers the prints that fail and never reach a customer. The margin is your profit on top. Work through them in that order and the final price almost always surprises people, because the filament is the smallest part of it.
Here is what each piece means before we calculate them.
| Cost | What it covers | Typical share of total |
|---|---|---|
| Material | Filament actually used, including waste and purge | Often the smallest part |
| Electricity | Power the printer draws while printing | Usually small |
| Machine wear | Depreciation, nozzles, belts, maintenance | Small but real |
| Labour | Your time: prep, slicing, monitoring, post, packing | Usually the largest |
| Failure buffer | The prints that fail and get binned | A multiplier, not a line item |
| Margin | Your profit | Set deliberately, not by accident |
1. Material cost
This is the one everyone gets right, so it is the easy starting point.
Formula: grams used × (spool price ÷ 1000)
Your slicer tells you the grams a print uses after slicing, and Quotruder reads it straight from the G-code. Take your spool price and divide by 1000 to get a price per gram. A 25 currency-unit spool is 0.025 per gram. A print that uses 85 g of that filament costs 85 × 0.025 = 2.13 in material.
Two things people forget. First, add a little for waste: purge lines, skirts, the odd failed first layer, and on multi-material machines the purge between colours, which can be significant. A flat 5 to 10 percent uplift on material covers it. Second, different materials cost very different amounts, and the right material is a pricing decision as much as a strength one. If you are not sure which to quote, our filament guide breaks down PLA, PETG, ABS and TPU and what each is good for.
2. Electricity cost
Smaller than people fear, but worth getting right, especially where power is expensive.
Formula: average draw (kW) × print time (hours) × price per kWh
The trap is using the printer's nameplate wattage. A machine rated at 250 W does not pull 250 W the whole print. The heated bed and hotend cycle on and off, so the average draw over a long print is much lower, often somewhere around 70 to 150 W for a typical desktop machine, higher if it has a heated chamber. The only way to know your real number is to measure it with a cheap plug-in energy meter for one full print, then reuse that figure.
Your rate matters a lot here because it varies wildly by region. As of 2026, German households pay roughly 0.36 per kWh, the EU average sits near 0.29, and US households are closer to 0.15. So the same print costs more than twice as much to run in Hamburg as in Texas. Plug in your own rate.
Worked piece: a printer averaging 120 W (0.12 kW) over a 6 hour print at 0.30 per kWh costs 0.12 × 6 × 0.30 = 0.22. Small, but it scales fast across a busy print farm.
3. Machine wear (depreciation and maintenance)
This is the cost people skip entirely, and skipping it means your printer is quietly wearing out on the customer's dime. Nozzles clog, belts stretch, PTFE tubes degrade, build plates lose their grip, and eventually the machine itself reaches the end of its life. All of that is a cost of doing the print.
Formula: (printer price + expected lifetime maintenance) ÷ expected lifetime print hours
Pick conservative numbers. Say a printer costs 1000, you budget another 500 in nozzles, belts, sheets and parts over its life, and you expect 6000 printing hours out of it. That is (1000 + 500) ÷ 6000 = 0.25 per printing hour. A 6 hour print carries 6 × 0.25 = 1.50 of wear.
If you run premium machines you may get more hours and lower hourly wear; budget machines may be the reverse. The reliability of the printer feeds directly into this number, which is one reason a dependable machine can be cheaper per part despite costing more up front. Our Prusa lineup guide covers where that reliability comes from across their range.
4. Labour (your time)
The big one, and the one that separates a hobby from a business. Your time has a value whether or not you charge for it. If you do not, you are working for free and subsidising every customer.
Count every minute the job actually takes you:
- Preparing and repairing the model, if needed
- Slicing and dialling in settings
- Loading filament, starting and checking the print
- Removing it, removing supports, sanding, smoothing, any post-processing
- Quality check, packing and labelling
Multiply the total by an hourly rate you would be happy to earn. Even at a modest rate this dominates most quotes. Worked piece: 30 minutes of hands-on time at 20 per hour is 0.5 × 20 = 10.00. Note that this is hands-on time, not print time. You do not charge for the hours the machine runs unattended, only for the minutes you actually spend on the job. The unattended hours are already paid for by the wear and electricity costs.
5. The failure buffer
Some prints fail. The filament, power, wear and time that went into a failed print are real costs, but there is no customer to bill for them, so the successful prints have to carry them.
Formula: divide your running cost by (1 − failure rate)
If 1 in 12 prints fails, your failure rate is about 8 percent, so you divide by 0.92, which adds roughly 9 percent. Track your real failure rate over time rather than guessing. A well-tuned machine with dry filament might sit at 3 to 5 percent; a tricky material or a fussy geometry can be far higher, and you should quote those jobs accordingly.
6. Margin (your profit)
Everything so far gets you to cost. Margin is what turns cost into a price worth running a business for. This is where one common mistake costs people real money: confusing markup with margin.
- Markup is profit as a percentage of cost.
price = cost × (1 + markup) - Margin is profit as a percentage of the final price.
price = cost ÷ (1 − margin)
A 50 percent markup is not a 50 percent margin. If your cost is 15, a 50 percent markup gives a price of 22.50 and a margin of only 33 percent. To actually keep 50 percent of the sale price as margin, you divide: 15 ÷ 0.5 = 30. Decide which number you care about and be consistent. Most makers think in margin, because it tells you what share of each sale is actually yours.
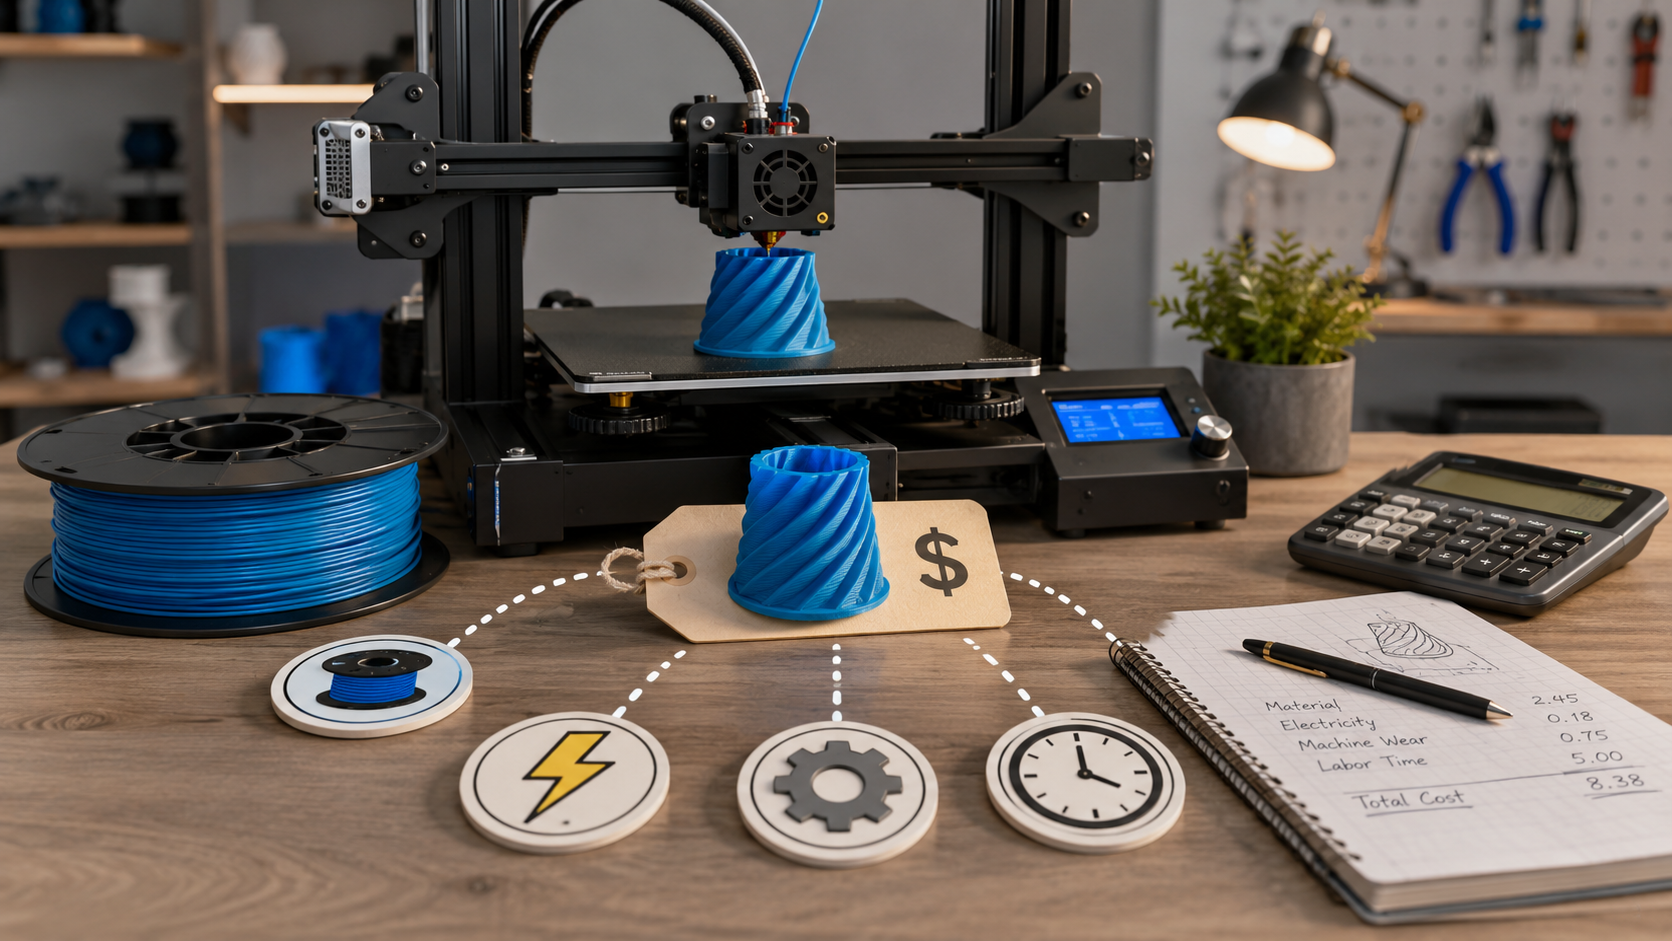
The full worked example
Let us price one real print end to end: a functional PETG bracket.
| Step | Calculation | Cost |
|---|---|---|
| Material | 85 g × 0.025/g | 2.13 |
| Electricity | 0.12 kW × 6 h × 0.30 | 0.22 |
| Machine wear | 6 h × 0.25/h | 1.50 |
| Labour | 0.5 h × 20/h | 10.00 |
| Running cost | sum of the above | 13.85 |
| Failure buffer | 13.85 ÷ 0.92 (8% failure) | 15.05 |
| Margin | 15.05 ÷ 0.50 (50% margin) | 30.10 |
So a print whose raw filament cost 2.13 is correctly priced at around 30. That is the whole lesson in one table. If you had quoted "filament times three" you would have charged about 6.40 and lost money on every single one, because you never counted your half hour of labour or your machine wear.
Pricing models you can build on this
The formula gives you a true cost for any single print. How you present that to customers can vary:
- Per-job quoting. Run the full formula per print. The most accurate, and the right approach for custom and commission work.
- Per-gram pricing. A simple headline rate for catalogue items, derived by running the formula on a typical print and dividing out. Easy for customers, but check it still covers labour on small parts.
- Per-hour pricing. Common in print farms, where machine time is the bottleneck. Works best layered on top of a material charge.
- Minimum order fee. Always set one. A tiny part still costs you setup, handling and packing time, so a 5 g keychain should never be priced as if labour were free.
Most shops end up with a hybrid: a per-job formula for custom work, simplified per-gram or per-hour rates for repeat catalogue items, and a minimum fee underneath everything.
Common mistakes to avoid
- Charging only for material. The filament is usually the smallest cost. Pricing on it alone guarantees a loss.
- Forgetting your own time. Labour is normally the largest single cost. If you do not bill it, you do not have a business, you have an expensive hobby.
- Ignoring failed prints. They cost real money. The buffer is not optional.
- Confusing markup and margin. A "50 percent markup" keeps far less than half. Know which you mean.
- Never raising prices. Filament and electricity costs move. Revisit your rates a couple of times a year.
Let the calculator do it
You can do all of this by hand, and it is worth doing once so you understand where your money goes. But doing it for every quote, by hand, is slow and easy to get wrong under time pressure.
That is exactly what Quotruder is for. Drop in your sliced G-code and it reads the print time and filament usage automatically, then fills in material, electricity, wear and labour from your own printer and rate settings. You adjust the margin and failure buffer until the price fits, and export a clean PDF quote. The formula in this article runs in the background so you can price a print in under a minute, and price it right.